Leaky Fork Seals?
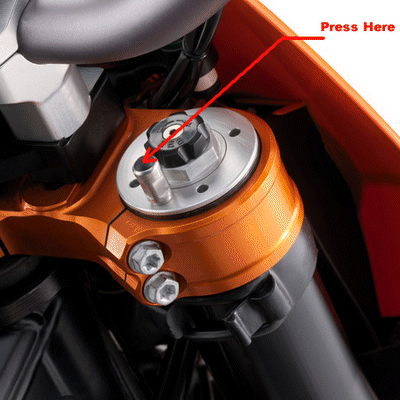
Leaking fork seals have been a known issue with KTM Suspension for years. What most people don't know is you can reduce the problem by allowing bleeding the built up air that gets trapped in your forks after every ride. All you need is to replace the air bleed screw that is on your forks with either the KTM Fork Bleeder Valve Set or Works Connection KTM Fork Bleeders. This gives you access to bleed that air out of your forks without the need for tools. This should be a religious exercise before (and after) every ride.
If you really want to get serious (and trick) consider the G2 KTM Remote Fork Bleeder System and a WP Fork Doctor.

Cut me some slack, man
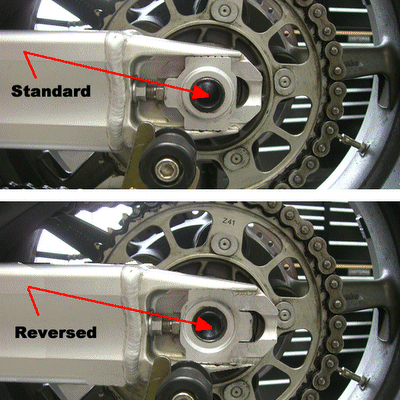
Did you know that when you go up in gearing on your rear sprocket that you may not have enough slack in your chain to make the change? Don't worry, you may not have to buy a new chain to make this change happen. You can simply remove and swap around your rear chain adjuster blocks on your rear axle which will move your axle closer to the front of your swingarm. This change will leave you additional slack in your chain allowing you to install that bigger rear sprocket without having to buy a new chain. This will allow you to go one or maybe two teeth bigger on your rear sprocket, depending on the condition of your chain.

Accessorize
Did you know that you have two auxiliary ports in the toolbox that allow you to mount any kind of electronic accessory you can think of? From a GPS unit to a simple set of heated grips you are covered with these accessory ports. They allow you to mount up a GPS or any other electronic device without routing all of the wires to the battery. This will eliminate the possibility of draining your battery when you forget to turn the device off. It also gives you a secondary fuse in case something goes wrong.

How to get to the auxiliary ports is easy. Simply remove the two sides of the bodywork that are directly on top of the two fuel tanks. A simple 5mm Allen wench will do the trick. There will be two hoses for venting that are attached to those two pieces of bodywork, so use a pair of needle nose pliers to undo the clamps and disconnect them. Now with the headlight and windscreen left on the front end remove those and put those to the side. Once you have all of that taken care of you should be looking at the back side of your fuse box. You will notice that Auxiliary accessory port one is empty and ready for use.
The second auxiliary port can be used but remember that this port is also being shard with your clock. Wire up your goodies and install the headlight, windscreen and side bodywork back on in reverse order. Now go out there and ride.
Ron
Gearing
An old mechanic once told us that one of his favorite tricks was to put a smaller front sprocket on the bikes after a major service. This was the old days when presumably you knew everyone whose bike you worked on. Anyway, the customers were always amazed at how much faster the bike was. Well, the same is true for the 950 Adventure.
It's nice to know that your 950 will top out over 130 mph but how useful is that in the real world? Before you start spending the big bucks trying to get more power we suggest you move the existing power to a more usable range. Dropping down to a 16 tooth front sprocket gives you much better low-end power and better acceleration, yet it still allows a comfortable cruising RPM.
Warning:
KTMtwins.com takes no responsibility for any unsolicited wheelies that may occur following installation.
Transmission Quick Fix
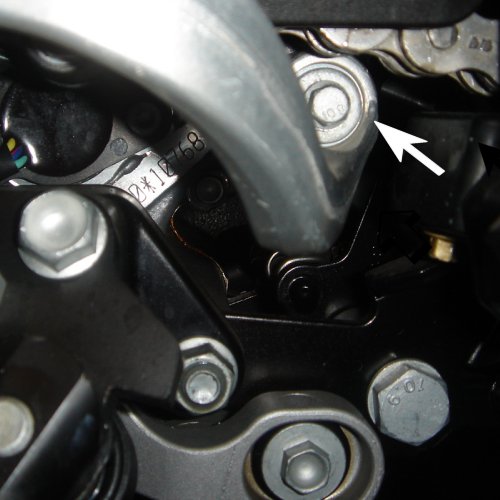
You are riding down the road, and suddenly your “shifts like a knife through butter” 950 Adventure does not want to change gears. It will go into first, but it takes two or three tries to get into the higher gears. Don’t fret. More often than not the cause is simply that the shift lever bolt has come loose, and the gear shifter is working its way off the shaft.

To remedy this (or better yet, prevent it from happening in the first place):
1. mark the location of the lever (a simple scribe mark at the splines will suffice)
2. remove the bolt
3. remove the lever from the shaft
4. clean both parts thoroughly
5. reassemble, with a drop of removable locking agent such as Loctite 242 (blue)
on the bolt
This one is high up on the list of preventative maintenance.
| Scotts Oil Filter |  |
We think the best tips are the ones that keep you from getting stranded in the middle of nowhere. This is one of those tips.
We all know that the early 950’s have on occasion, had some issues with the water pump seals and shafts. On these occasions it is not unusual for the bike to suffer a loss of oil pressure causing the oil light to come on, and the valve train to start clattering (is that a word?) Anyway the reason for the lack of oil pressure is that the water getting into the oil breaks down the paper oil filter collapsing it and causing it to swell. When this happens well, you get the picture.
On almost every bike that we’ve seen with a bad water pump seal, the only evidence was the damaged oil filter. If you were to put a new filter in and some fresh oil the bike would run just fine until the filter broke down again. Just in case you are wondering, it didn’t take us long to figure out that there was a reason the oil filter was breaking down….
Anyway, the point of all this is that a Stainless Steel oil filter like the Scotts Filter will not collapse like a paper filter. Although we don’t recommend running your bike with water contaminated oil (even if it is so slight that it’s evaporating form the heat of the engine before you can even tell), if you are 50 miles from the nearest road I’m going to think you may want to have the option. And certainly we’d rather have a filter that won’t under any condition, contribute to a loss of oil pressure in our bikes. For that reason the Scotts filter gets the KTMtwins seal of approval.
 |
|
Sag Here is the deal with Springs and Spring Force: Springs are rated in one of three different numbering conventions. KTM springs are all rated in Newtons. The Standard KTM spring rates are 4.8 Newtons per mm in front, and 150 Newtons per mm (STD) or 140 Newtons per mm(S). This is why your spring is marked 140-225 or 150-225, these numbers are the rate (in Newtons) and the length (225mm). Now onto the good stuff: When you compress a linear spring 1mm, you will store force in the spring equal to it's rate. This applies to any millimeter of compression, whether it comes from preload, a riders weight, or a bump in the road. The spring doesn't care, it's a spring, it's got bigger problems. So knowing this, lets do a bit of analysis on our 950. The Stock Spring is a 4.8N/mm spring. The stock Preload is 17mm assembled. Why did I say assembled you ask? Good Question. When fiddling with Preload adjusters on the outside of a fork, it is important to remember that when the fork was assembled, in most cases it was put together with some preload already on the spring.often in the form of spacers. When you turn the external adjuster, you are simply adding to this total. So to do the math , we need to know the total preload, not just the external. So, we have 17 times 4.8 = 81.6N of force stored before we take the bike off the stand. Now we drop the weight of the bike on top of this poor spring, and as you probably guessed, 81.6Newtons of force is not going to hold our 950 all the way up, so our spring will sag some.The sag of the bike under it's own weight is the Static sag. This sag compresses the spring further. Let's say in stock trim the bike sags 50mm under it's own weight. Add 50mm of spring compression at 4.8N per mm = another 240N of force stored. For a total 321.6N of force. Now knowing the spring rate, the preload and the sag, we can change any of these variables and calculate the others with the following formula: Spring Rate*(Preload+Sag) = Load (as we just explained above) 4.8*(17+50)=321.6 Then to calculate the required change in preload should you change the spring: Or the change in sag if you change the preload: Keep in mind that you can use this calculation for Static sag or for Total(commonly called Race) sag. But you cannot mix and match. One or the other only please. Sag diatribe authored by Burnt Guy James Siddall @ superplushsuspension.com |


